Xtext is a framework for development of textual domain specific languages (DSLs). You need to describe the DSL using Xtext's simple grammar and Xtext generates a parser, an editor and other goodies. You are on the way to create your own IDE for the DSL.
Thursday, August 27, 2009
Pythonisque indent/dedent block structure for a Xtext DSL
Xtext is a framework for development of textual domain specific languages (DSLs). You need to describe the DSL using Xtext's simple grammar and Xtext generates a parser, an editor and other goodies. You are on the way to create your own IDE for the DSL.
Monday, July 28, 2008
ResourceSelectionDialog: adding filter capabilities
- Copy the code (in this case RSD) and modify it to our purposes. A major issue with this approach is that not only ResourceSelectionDialog.java, but you need to also copy all other classes that are used by RSD that are not made public by the plugin. Depending on the case these might be few or a lot.
- Another approach is to derive a class from RSD (though the documentation says that we should not) and implement the required functionality. In the case of RSD, we need to override the createDialogArea because the getResourceProvider is private and we need to add functionality into the getResourceProvider.
- Create a patch to RSD and submit to eclipse and hope that it will get included. Seeing that this request is made almost 3 years back (see bug 91227 and bug 124338) and still there is not much of movement, you must be very lucky for this to get included and be ready for your plugin release.
- The one option I want to discuss in this post is to bend the RSD to work your way. GoF has a nice little pattern for this - they call it adapter.
Convert the interface of a class into another interface clients expect. Adapter lets classes work together that couldn't otherwise because of incompatible interfaces.
Tuesday, July 15, 2008
A categorized content assist processor
I posted an enhancement to eclipse bugzilla, that will allow editors to support multiple categories of content assist processors. I hope it will make to eclipse sometime, meanwhile you can pick up the code from the bug entry.
Monday, June 30, 2008
Programmatically opening an editor
The class org.eclipse.ui.IDE has a set of static functions that opens an editor and returns a handle to that editor. This function needs a IWorkbenchPage. We can typically get it by PlatformUI.getWorkbench().getActiveWorkbenchWindow().getActivePage(). The second parameter is a handle to the file. It can be a reference to IFile, URI, IMarker, IEditorInput, IFileStore or a URI. The last two cases typically open editors for the files that are outside the file system.
I came across this gem when I need to open an editor on a OS file path. The file is in the workspace, but the path is OS specific. In this case I used ResourcesPlugin.getWorkspace().getRoot().getFileForLocation(Path.fromOSString(file)) to convert the OS path into an IFile. The getFileForLocation() returns null in case the path does not belong to the workspace. That is OK - that is what I exactly wanted.
So here is the entire code:
String filePath = "..." ;
final IFile inputFile = ResourcesPlugin.getWorkspace().getRoot().getFileForLocation(Path.fromOSString(filePath));
if (inputFile != null) {
    IWorkbenchPage page = PlatformUI.getWorkbench().getActiveWorkbenchWindow().getActivePage();
    IEditorPart openEditor = IDE.openEditor(page, inputFile);
}
If you want to position the cursor to a specific line in the editor - do the following.
int Line = ...
if (openEditor instanceof ITextEditor) {
    ITextEditor textEditor = (ITextEditor) openEditor ;
    IDocument document= textEditor.getDocumentProvider().getDocument(textEditor.getEditorInput());
    textEditor.selectAndReveal(document.getLineOffset(line - 1), document.getLineLength(line-1);
}
Monday, July 23, 2007
QuickFix: Converting an Eclipse Preference Page to a View
Now for the quick fix.
public void createPartControl(Composite parent) {
PreferenceDialog dialog = PreferencesUtil.createPreferenceDialogOn(
       parent.getShell(),
      "org.eclipse.jdt.ui.preferences.JavaTemplatePreferencePage",
       new String[] {}, null);
PreferencePage selectedPage =
      (PreferencePage) dialog.getSelectedPage();
selectedPage.createControl(parent);
}

From this view, you can add/edit the templates.
Incidentally, this trick should work for any preference page that is derived from PreferencePage class.
Thursday, July 12, 2007
Tip: Creating and Sharing Launch Configurations
This happened again. I downloaded a Java product from sourceforge. It came with a .project, so it is easy enough to import it into the eclipse workspace. Now, comes the humdinger of the problem. How in the world should I launch the application. I can also see a tests package, how can I launch the tests?
Fortunately, eclipse solves this problem through launch configurations. If you are developing on eclipse there is no reason for not sharing the launch configurations along with the code. A launch configuration is a way to inform a fellow developer how to invoke the application. It is like providing a helping hand in during the initial stages - till he/she grows up and find how to launch the application, tests or whatever by themselves.
Temporary launch configurations
If you rightclick on a test case or a main class and used 'Run as...', eclipse creates a launch configuration and invokes the application for you. While developing an application (if you are like me) - you will accumulate a lot of launch configurations. These launch configurations are saved along with the workspace and not shared.
Creating a launch configuration
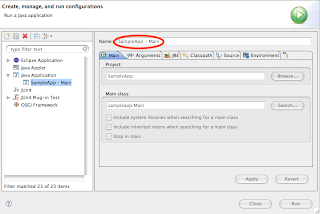
For creating a launch configuration start with a temporary launch configuration. Open the Run -> Run dialog... option from the eclipse menu.

Change the launch configuration name. Use a name that includes atleast the project name and the type of launch it is. No one can understand what 'Main' or 'AllTests' stand for. It is easy to understand 'SampleApp - Main' or 'SampleApp - AllTests'.

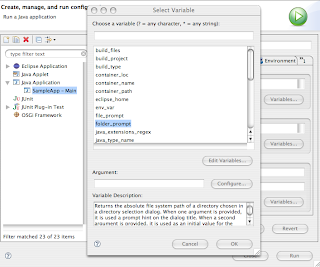
You can set the arguments for the VM as well as application from the (surprise!) Arguments tab. As far as possible parameterize the arguments. Do not ever use hard coded file names or directory names in a launch configuration that is shared. Eclipse has predefined variables 'file_prompt', 'folder_prompt' and 'string_prompt' for this purpose. When a launch configuration with such parameters is launched, Eclipse prompt the user to either select a file/folder or enter a string.
If your launch is dependent on a particular Java version (suppose you need atleast JDK 1.5 to work) - use the JRE tab to select the JRE. It is advisable to select a particular 'Execution environment' rather than an installed JRE.
The rest of the tabs are self explanatory. If you added any environment variables, remember to parameterize them wherever needed. Launch the configuration using the 'Run' option in the dialog and check everything works fine.
Sharing a launch configuration
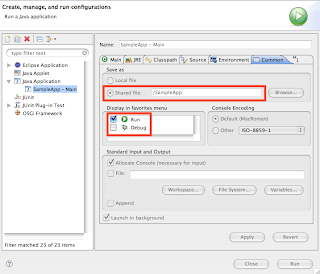
If you want to share a launch configuration, you do it through the 'Run dialog'. For opening the run dialog use Run -> Run dialog... option from the eclipse menu. The sharing option is in the 'Common' tab of the run dialog.

Select the 'Shared file' option. Select the project to which this launch configuration belongs. I suggest the launch configurations to be saved at the root of the project directory. You can also add the launch configuration to the favorites menu (either to Run or Debug). Just click on 'Apply' and the launch configuration is saved. From now onwards, anyone who imports your project can launch the application by just clicking on the launch configuration file and selecting Run as -> <launch name&rt;.
Launch configuration best practices
- Provide launch configurations for all modes of launch. For example, if your application can be launched in UI and command line mode, provide two launch configurations one for each.
- Do not proliferate the project with temporary launch configurations. I have a separate project where I save all of my temporary launch configurations. This will be checked into the SCM, but not shared along with the project.
- Provide a launch configuration for running all the tests (if exists).
- Do not add optional launch configurations into the favorites. My suggestion is to add only the application and all tests into the favorite menu.
- Parameterize the launch configurations using eclipse variables - folder_prompt, file_prompt and string_prompt.
- Select an appropriate JRE using the JRE tab and an execution environment.
Finally, launch configurations are for fellow developers and not for end users. Keep it in mind when you create a configuration. Too much of hand-holding might not be needed.
